
티스토리 뷰
[React TypeScript] Naver Map API 적용 - 내 위치, 위경도로 마커 찍기, open api CORS 에러
우징어🦑 2022. 4. 30. 00:10Typescript와 React를 이용한 프로젝트를 진행중이다.
현재 초기 개발단계인데 Naver map api를 사용할 일이 생겼다.
그래서 그 사용법과 현재까지 맞닥뜨린 문제(CORS 에러)들을 정리하고자 한다.
navermaps 패키지 설치
우선 React/Typescript 에서 네이버 맵을 사용하기 위해 typescript를 위한 navermaps 패키지를 설치한다.
npm install --save @types/navermapsjavascript를 사용할 경우 react-naver-maps 패키지를 설치해도 되는데, 해당 패키지에는 typescript 정의가 되어 있지 않아서 위 패키지를 설치해줘야 한다.
index.html 에 script 추가
public/index.html 파일에서 body 태그 내에 다음과 같은 내용을 추가하여 아래와 같이 입력한다.
<body>
    <noscript>You need to enable JavaScript to run this app.</noscript>
    <div id="root"></div>
    <script
      type="text/javascript"
      src="http://openapi.map.naver.com/openapi/v3/maps.js?ncpClientId={발급받은 Client key}"
    ></script>
</body>
지도 띄우기
MapTest.tsx 라는 컴포넌트를 하나 선언해준 뒤, 지도를 표시하는 코드를 작성했다.
그리고 Map.tsx 페이지에서 해당 컴포넌트를 렌더링 해주었다.
MapTest.tsx
const MapTest = () => {
    const { naver } = window;
    const [myLocation, setMyLocation] = useState<
        { latitude: number; longitude: number } | string
    >("");

    return <div id='map' style={{ width: "100%", height: "500px" }} />;
}
useState로 myLocation 변수를 선언하여 위도(latitude)와 경도(longitude)를 number로 지정해준다.
이 변수에 현재 위치를 저장할 것이다.
현재 위치 받아와서 마커로 표시하기
// 현재 위치 받아오기
useEffect(() => {
if (navigator.geolocation) {
navigator.geolocation.getCurrentPosition((position) => {
setMyLocation({
latitude: position.coords.latitude,
longitude: position.coords.longitude,
});
});
} else {
window.alert("현재위치를 알수 없습니다.");
}
}, []);
useEffect(() => {
if (typeof myLocation !== "string") {
const currentPosition = [myLocation.latitude, myLocation.longitude];
const map = new naver.maps.Map("map", {
center: new naver.maps.LatLng(currentPosition[0], currentPosition[1]),
zoomControl: true,
});
}
}, [myLocation]);
// 내 위치 마커 표시하기
useEffect(() => {
if (typeof myLocation !== "string") {
const currentPosition = [myLocation.latitude, myLocation.longitude];
const map = new naver.maps.Map("map", {
center: new naver.maps.LatLng(currentPosition[0], currentPosition[1]),
zoomControl: true,
});
const currentMarker = new naver.maps.Marker({
position: new naver.maps.LatLng(currentPosition[0], currentPosition[1]),
map,
// 원하는 이미지로 마커 커스텀
// icon: {
// url: pinImage,
// size: new naver.maps.Size(50, 52),
// origin: new naver.maps.Point(0, 0),
// anchor: new naver.maps.Point(25, 26),
// },
});
}
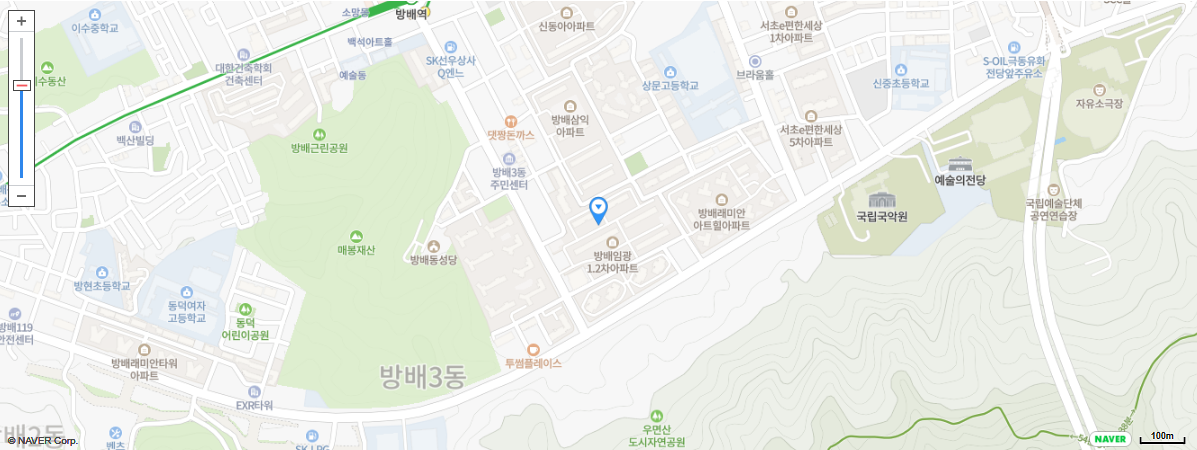
}, [myLocation]);현재 위치를 받아와서 마커로 표시한다.
주석 처리 해놓은 곳에서 icon을 커스텀 이미지로 변경할 수 있다.
주변 위치 마커로 표시하기 & 클릭 오버레이 이벤트 적용
주변 위치들의 위경도를 변수로 추가해준다. 일단 내 위치 주변의 임의의 값들을 넣어주었다.
myLocation 바로 아래에 선언해주었다.
const otherLatLngs = [
    { lat: 37.4859, lng: 126.997865 },
    { lat: 37.48528, lng: 126.997227 },
    { lat: 37.485535, lng: 126.999528 },
    { lat: 37.484234, lng: 126.999292 },
];
useEffect(() => {
    if (typeof myLocation !== "string") {
        const currentPosition = [myLocation.latitude, myLocation.longitude];

        const map = new naver.maps.Map("map", {
            center: new naver.maps.LatLng(currentPosition[0], currentPosition[1]),
            zoomControl: true,
        });

        const currentMarker = new naver.maps.Marker({
            position: new naver.maps.LatLng(currentPosition[0], currentPosition[1]),
            map,
        });

        // 주변 마커 나타내기
        for (let i = 0; i < otherLatLngs.length; i++) {
            const otherMarkers = new naver.maps.Marker({
                position: new naver.maps.LatLng(
                    otherLatLngs[i].lat,
                    otherLatLngs[i].lng
                ),
                map,
            });
        }
    }
}, [myLocation]);

// 주변마커 오버레이 클릭 이벤트 적용하기
useEffect(() => {
    if (typeof myLocation !== "string") {
        const currentPosition = [myLocation.latitude, myLocation.longitude];

        const map = new naver.maps.Map("map", {
            center: new naver.maps.LatLng(currentPosition[0], currentPosition[1]),
            zoomControl: true,
        });

        const currentMarker = new naver.maps.Marker({
            position: new naver.maps.LatLng(currentPosition[0], currentPosition[1]),
            map,
        });

        // 주변 마커 나타내기
        const markers: naver.maps.Marker[] = [];
        const infowindows: naver.maps.InfoWindow[] = [];
        const contentTags =
            '<div class="naver-container"><p class="ptag">여깁니다</p><span class="spantag">맞아요</span></div>';

        // 반복문을 통해 찍어준다
        for (let i = 0; i < otherLatLngs.length; i += 1) {
            const otherMarkers = new naver.maps.Marker({
                position: new naver.maps.LatLng(
                    otherLatLngs[i].lat,
                    otherLatLngs[i].lng
                ),
                map,
            });

            const infowindow = new naver.maps.InfoWindow({
                content: contentTags,
                borderWidth: 1,
                anchorSize: new naver.maps.Size(10, 10),
                pixelOffset: new naver.maps.Point(10, -10),
            });

            markers.push(otherMarkers);
            infowindows.push(infowindow);
        }

        naver.maps.Event.addListener(map, "idle", () => {
            updateMarkers(map, markers);
        });

        const updateMarkers = (
            isMap: naver.maps.Map,
            isMarkers: naver.maps.Marker[]
        ) => {
            const mapBounds: any = isMap.getBounds();
            let marker;
            let position;

            for (let i = 0; i < isMarkers.length; i += 1) {
                marker = isMarkers[i];
                position = marker.getPosition();

                if (mapBounds.hasLatLng(position)) {
                    showMarker(isMap, marker);
                } else {
                    hideMarker(marker);
                }
            }
        };

        const showMarker = (isMap: naver.maps.Map, marker: naver.maps.Marker) => {
            marker.setMap(isMap);
        };

        const hideMarker = (marker: naver.maps.Marker) => {
            marker.setMap(null);
        };

        const getClickHandler = (seq: number) => {
            return () => {
                const marker = markers[seq];
                const infoWindow = infowindows[seq];

                if (infoWindow.getMap()) {
                    infoWindow.close();
                } else {
                    infoWindow.open(map, marker);
                }
            };
        };

        for (let i = 0; i < markers.length; i += 1) {
            naver.maps.Event.addListener(markers[i], "click", getClickHandler(i));
        }
    }
}, [myLocation]);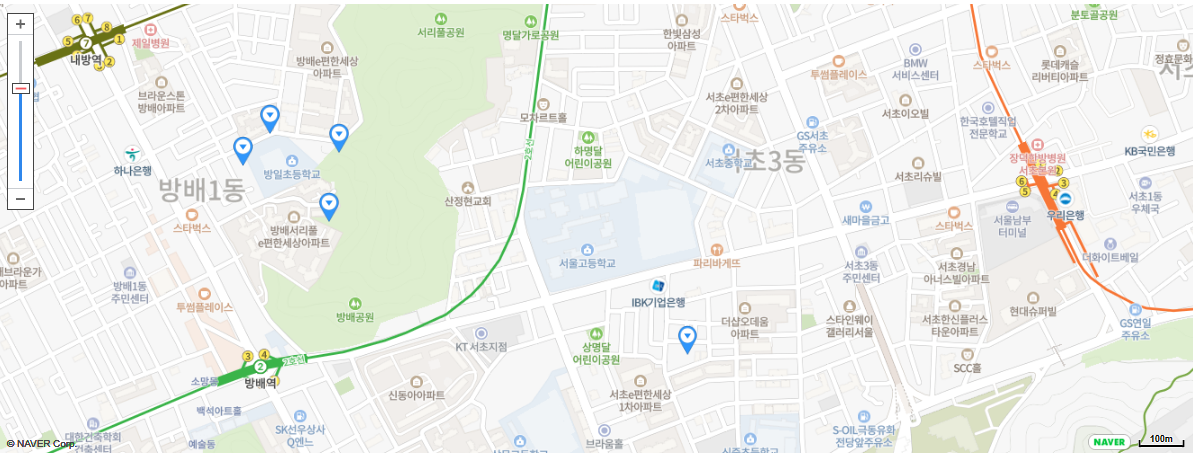
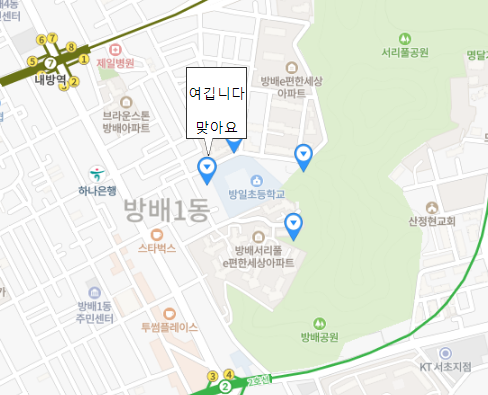
클릭하게 되면 미리 넣어놓은 메세지가 이벤트로 출력된다.
추후에 장소마다 등록된 정보를 띄우는 걸로 수정해야겠다.
.env 에 key 값 정리하기
Naver Map open api를 사용할 예정인데, api를 사용할 때 header에 client key와 secret key가 들어간다.
네이버에서 발급받은 client key와 secret key는 지속적으로 쓰일 수 있기 때문에 key를 .env에 따로 빼서 저장해두고 필요할 때마다 변수로 쓰려고 한다. .env 파일은 루트 폴더 아래에 생성한다.
.env
NAVER_ID = 발급받은 client key
NAVER_SECRET = 발급받은 secret key
사용할 때에는 아래와 같이 사용하면 된다.
process.env.NAVER_ID
process.env.NAVER_SECRET
Naver Map Open API - Reverse Geocoding
위경도로 받아온 현재 나의 위치를 주소명으로 변환하는 기능을 구현해야하기 때문에 reverse geocoding api를 쓸 예정이다.
[참고] Naver Map reverse-geocoding 공식문서 : https://api.ncloud-docs.com/docs/ai-naver-mapsreversegeocoding-gc
gc - Reverse Geocoding
api.ncloud-docs.com
const [geoUrl, setGeoUrl] = useState("");  // open API를 호출할 때 쓰이는 url

useEffect(() => {
    if (navigator.geolocation) {
        navigator.geolocation.getCurrentPosition((position) => {
            setMyLocation({
                latitude: position.coords.latitude,
                longitude: position.coords.longitude,
            });
            // 현재 위경도를 넣어 url setting
            setGeoUrl('https://naveropenapi.apigw.ntruss.com/map-reversegeocode/v2/gc?coords='
                + `${position.coords.latitude},${position.coords.longitude}`
                + '&orders=addr&output=json')
        });
    } else {
        window.alert("현재위치를 알수 없습니다.");
    }
}, []);

useEffect(() => {
    // Reverse Geocoding Open Api 호출 시도 -> proxy 우회도 해봤지만 실패. 백단에서 시도하기
    console.log('geoURL:::', geoUrl);
    const getAddress = async () => {
        axios.request({
            url: geoUrl,
            method: 'GET',
            headers: {
                'X-NCP-APIGW-API-KEY-ID': process.env.NAVER_ID as string, //앱 등록 시 발급받은 Client ID
                'X-NCP-APIGW-API-KEY': process.env.NAVER_SECRET as string, //앱 등록 시 발급받은 Client Secret
            }
        })
        .then(res => {
            console.log(res.data);
        })
    }
    getAddress();
})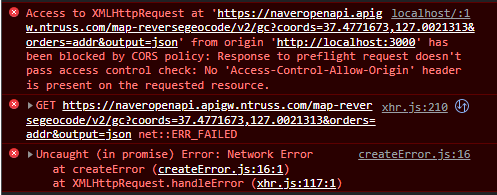
호출했더니 어김없이 뜨는 CORS 에러..
프로젝트를 할 때마다 얘 때문에 고생했어서 개념은 알고 있다만 해결하려 할 때마다 골머리를 썩는다.
CORS 에러를 근본적으로 해결하려면 백 단에서 cross origin 승인을 하는 코드를 작성해주면 되는데,
현재 나는 프론트 단에서 테스트하고 있기 때문에 임시방편으로 프록시 우회하는 방법을 사용하려 했다.
프록시 우회하여 api 호출
프록시 우회하는 방법은 package.json 파일에 호출하려 하는 api의 오리진 url을 적는다.
"proxy": "https://naveropenapi.apigw.ntruss.com"그리고 해당 api를 호출하는 곳에서는 오리진 url을 빼고 적어준다.
나의 경우에는
setGeoUrl('https://naveropenapi.apigw.ntruss.com/map-reversegeocode/v2/gc?coords='
    + `${position.coords.latitude},${position.coords.longitude}`
    + '&orders=addr&output=json')
이 부분의 코드를
setGeoUrl('/map-reversegeocode/v2/gc?coords='
    + `${position.coords.latitude},${position.coords.longitude}`
    + '&orders=addr&output=json')
이렇게 바꿔주었다.
그랬더니 결과는..
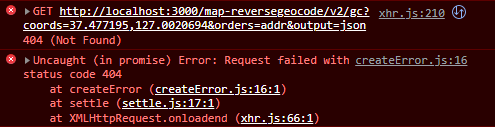
음.. 오리진은 바뀌었다만 404 에러가 뜨면서 제대로 받아와지지 않는다.
지난번에 시도했을 때는 401(unauthorized) 에러가 뜨면서 받아와지지 않았었는데 지금은 404가 뜬다.
관련해서 구글링을 해보니 네이버맵을 포함한 몇몇 open api는 서버 프로그래밍만을 통해 호출할 수 있다고 한다. 클라이언트 id, secret key를 도용하는 것을 방지하기 위한 이유라고 한다.
즉 백단에서 해결하는 수밖에 없다는 이야기다.
이 부분에 있어서는 추후 백 팀원들과 이야기해봐야겠다.
네이버맵 api를 이용하는 과정을 잘 정리한 포스트가 있어서 참고하여 진행하였다.
https://velog.io/@kyungjune/naver-map-api-%EA%B8%B0%EC%96%B5%ED%95%98%EA%B8%B0react.ts
naver map api 기억하기(react.ts)
react.ts로 naver map api를 사용한 과정을 적는 글이다. 먼저 naver dev 홈페이지 로 들어가서 로그인을 한다(회원이 아니라면 회원가입 후 카드등록 정보까지 작성해주어야한다.)1\. 우측 상단에 console
velog.io
'프로그래밍 > React' 카테고리의 다른 글
| [React] Heroku 배포 시 이슈 정리 (경험 기록) (0) | 2022.08.15 |
|---|---|
| [Redux 기초 공부] (0) | 2022.08.04 |
| [React] video 삽입하기, Public 폴더 수정 후 해당 파일 접근 url 사용법 (0) | 2022.04.26 |
| 리액트 초기 폴더 구조 및 Router 설정 :: react-router-dom, BrowerRouter (0) | 2022.04.23 |
| useState 비동기 문제 - useEffect로 해결하기 + Email Format/Validation Check 코드 (2) | 2022.03.02 |
- Total
- Today
- Yesterday
- 정적 웹페이지 배포
- aws생성형ai
- awsgenai
- vscode easycode
- partyrock무료
- easycode chatGPT
- 병돌리기구현
- BOJ
- AWSBedrock
- 술자리병돌리기게임
- partyrock
- 코딩테스트
- 오블완
- SpacewBetween
- 생성형AI
- ChatGPT
- partyrock생성
- React native 작동 원리
- S3배포
- 백준
- PYTHON
- 티스토리챌린지
- 정적 웹사이트 배포
- partyrock사용볍
- partyrock앱
- easycode
- S3 403 forbidden
- 파이썬
- 알고리즘
- genaiapp
| 일 | 월 | 화 | 수 | 목 | 금 | 토 |
|---|---|---|---|---|---|---|
| 1 | 2 | 3 | ||||
| 4 | 5 | 6 | 7 | 8 | 9 | 10 |
| 11 | 12 | 13 | 14 | 15 | 16 | 17 |
| 18 | 19 | 20 | 21 | 22 | 23 | 24 |
| 25 | 26 | 27 | 28 | 29 | 30 | 31 |